Assembling the Stand for C Model Cutting Plotter
In this video, we're going to be going over the parts and pieces that you should have received for your stand, as well as how to put your stand together.
 Audited supplier
In this video, we're going to be going over the parts and pieces that you should have received for your stand, as well as how to put your stand together.
First, we're going to go over the tools that you will need in order to complete the stand project. Most of the tools are given to you in the box.
Here are the tools that are in the box. We have the wrench as well as an Allen wrench. Now, the tool that you will need that is not included in the box is a Phillips screwdriver.
In your package, you should have received 16 nuts, 16 washers, and 16 bolts. As you can see from the bolt end, that is where the hex key will be involved. The wrench will be used to secure the nut when you are assembling your stand.
These four bolts that you see right here are for your machine. That's what you're going to use to attach it to your stand. Notice that these screws may look a little similar to the other four that are remaining, but this one has a beveled top. It has a locking washer and another washer. That is how you can tell the difference in these screws.
You should have also received four of these screws. They'll have a flat top and a Phillips screwdriver will be needed. This is what's going to be used when you're mounting the brackets to your stand.
In your kit, you should have received two leg stands, two mounting brackets, two roller brackets, two rollers, two support beams, and the two leg supports.
The first thing that we're going to do is we're going to connect the horizontal leg to the vertical stand support that you see right here.
So the vertical stand support actually has four holes altogether when we're looking at either the top or the bottom. You're going to want to find the holes that are the largest at the end. That's where we're going to connect the horizontal leg stand.
Once you line up the holes, you're going to want to use the hex nut and bolts in order to secure this.
The technique that we're going to use on this is we're going to screw this in to finger tight, and then we're going to use the wrench along with the Allen wrench to firmly secure the stand. So, each support leg has two of those holes for you to secure. Once you're done with the second hole, it's going to be time to repeat this process on the second leg.
As you can see, we have both legs done. So, the next thing that we're going to do is we're going to add the mounting brackets to the tops of the support legs, and that's what's going to hold your machine on.
So each support leg is going to require two screws that look like this and the mounting plate that looks like this. You're going to want to line up the mounting plate with the two holes that are on the support leg itself.
Notice that the lip on the mounting bracket is going the same direction as if you could see the bolts that are on the horizontal leg beam. Once this bracket is mounted, you're going to want to repeat this process for the second leg stand.
With both mounting brackets on your supporting legs, it's time to add the cross-beam support for your stand, as you can see right here.
We're going to focus on one side at a time and to provide maximum support for your stand, you're going to need to alternate on the holes that you are going to use. As you can see here, we're going to start off with the bottom one on the right side and then we're going to install the top one on the left side of the rail. And again, we're only going to do one leg side at a time.
So for this next part, we're going to utilize two of the hex bolt and nuts to mount the supporting beam on this side of the leg. The first thing that you're going to want to do is match up the holes that are on your crossbeam support to the side of the leg. Again, we're going to follow the same process that we did before, where we're going to make the bolt and the nut finger tight. And then we're going to use the Allen key and the wrench to secure it more firmly.
So we're still working on the same leg and now it's time to move to the next section of that same leg so we can add the next support beam. Keep in mind that we're alternating on what side the crossbeam is to provide maximum support when the stand is fully assembled.
Now that we're done with the cross beams attached to one side of the stand, it's time to go grab the other side and line up the holes. We're going to repeat the process of using that same bolt that we used on the left side to use on the right side. Once these are both connected, then we can move on to the next step.
This right here is the top of the mounting bracket. It has a lip and two holes. This is where we're going to line up the holes and notice that the lip is going to go into the leg stand for more support. We're going to line up the holes and use the same bolts that we'd been using before, where it requires an Allen wrench and a wrench. These mounting brackets are used to hold the rollers for your vinyl. Once you're done with this side, it's time to repeat the process for the other side. Just make sure that the brackets are facing the right direction and they should be on the same side, once you are done.
For the last step, we should have four screws remaining. This is the screws with the beveled top. These are the four screws that will be needed in order to mount your machine to the stand.
If you rotate your machine where you can see the bottom, you should notice that there are four screw holes that are missing screws. Those four holes will be used in order to mount your machine to your stand.
For the last step you're going to want to place your machine on top of the stand. You're then going to need to line up the holes with the bracket holes so that you can put those four screws in. And you're going to use the Phillips screwdriver and screw them in. You’re going to repeat this process on all four holes and then you'll be complete.
And this completes your installation guide for installing your stand for your cutting machine.
Audited supplier
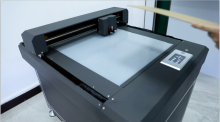
The operation-- How to use Skycut CA310 screen protective film cutter
Skycut F4560 Flatbed cutter with deepcut blade cutting
Skycut cutting plotter uses U Disk Connection to work with the Signmaster
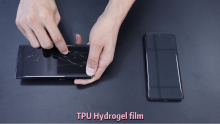
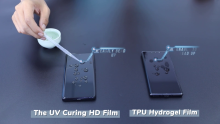
The UV Cured HD Film gives you a perfect protector with high transparency and high-response touch feeling.
Happy Christamas for Skycut team----Bring best wishes and joys for Skycut big family
How to connect Skycut mini cutter with Cannon Printer to make customized back film
The UV Cured HD Film gives you a perfect protector with high transparency and high-response touch feeling.
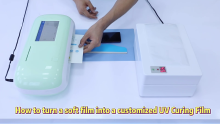
How to use a soft film into a custiomized UV cured film
DIY your favourite back fil for your mobile phone